From about 2010-2014, I studied painting at Sadie J. Valeri's 19th century French style Atelier. Given that Sadie's course covers construction and straight line block in, I wanted to spend this entry notating various drawing methods to make sure I have a clear understanding of each. This is not a part of the course study, rather a culmination of my own research. I am sure there are more systems of drawing out there; these are the primary representational methods and theories that seem the most popular. Please leave comments if you find something important that I am unaware of.
**********************************************
**********************************************
Sight Size
Sight size is a 19th century observational method of drawing that has recently been reintroduced, most notably by R. H. Ives Gammell, his student Richard Lack and many others. Most, if not all Ateliers teach using sight size so that the student can learn to compare the drawing to the subject very directly. Additionally, the Bargue drawing course also uses sight size as a way for students to learn to measure proportions and develop the eye. (more on the Bargue method in the link)
Sight size means to place the easel parallel to the subject, making measurements exactly as they are according to what is being seen. "The easel (with the drawing or painting) and the subject must be viewed together, from a distance that is great enough for the artist to view both at the same time. This distance is usually 3 times the greatest dimension of the work. The artist then stands in the viewing position to compare, walks forward to the easel to draw or paint and then backs up to the viewing position to check for errors." - from sightsize.com
Here is an excellent demo by artist Tim McGuire on the Artist Daily website. Entire demo can be seen HERE.

When researching sight size, I found a lot of controversy about it's use. Here is an excerpt from wetcanvas.com:
"While sight size can be a useful tool for any artist, beginning or otherwise,the problem with it for many is that while it is mechanically accurate, it is not always as successful at increasing the line flow or rhythms within the figures or throughout the composition. The connected flow of line (real or implied) is one of the means that renaissance painters used to naturally move the eye about the painting and to create the necessary unity. Without it, you sometimes get paintings that are simply a collection of individual, unrelated objects that are put into the picture and not a simple, unified mass(es) that is designed as one from the start. Look at renaissance figure drawings and at 19th or 20th century atelier figure drawings and you will see a difference. They can both be beautiful as studies or finished paintings but for many, there is a difference in the "life" and the beauty of composition between the two.
The other difficulty is that it is more difficult to use in many plein air or outdoor drawing or painting situations as it requires more time and you must be more particular about where you stand to produce the same sized images, ie model and drawing. This is usually not possible in the field (city or country) and in many real life situations where you have to draw something in motion or where space is limited. The renaissance painters seemed to rely on their knowledge of anatomy and drawing to produce a greater prortion of their figure drawings and were not dependent so much on painting or drawing from life to the extent that the 19th century academic painters appeared to be." - by Richard1, post 14
The other difficulty is that it is more difficult to use in many plein air or outdoor drawing or painting situations as it requires more time and you must be more particular about where you stand to produce the same sized images, ie model and drawing. This is usually not possible in the field (city or country) and in many real life situations where you have to draw something in motion or where space is limited. The renaissance painters seemed to rely on their knowledge of anatomy and drawing to produce a greater prortion of their figure drawings and were not dependent so much on painting or drawing from life to the extent that the 19th century academic painters appeared to be." - by Richard1, post 14
**********************************************
To summarize, this observational method utilizes a straight object like a knitting needle to find the largest angles and directions in wide sweeping areas of the subject to first form an "envelope", which represents the entire general area of the subject on the page. Once the largest areas are formed, smaller angles are found within using the same manner. As you work, the angles become increasingly segmented with more straight lines, breaking up the larger lines you first placed on the image.The concept is rather simple and seems pretty easy to learn.
Anthony Ryder has a great tutorial with photos HERE. Also, Sadie has an excellent figurative example on her website, which can be found HERE.
Also, a good book for this method is Juliette Aristides, "Lessons in Classical Drawing: Essential Techniques from Inside the Atelier".
I've tried lots of methods, sight size and others, and have found that the straight line block in saves me a lot of work in the long run if I take the time. What I particularly love about the straight line block in method is that if I want to scale my subject up or down, I can do that easily by making my envelope the size I would like and work from there. I have found when working in sight size that if I want to make a drawing or painting smaller, I need to move my easel way back, which means I can no longer see the details. This is the method I use most often when life drawing/painting, still life, and landscape.
Straight line block in
To summarize, this observational method utilizes a straight object like a knitting needle to find the largest angles and directions in wide sweeping areas of the subject to first form an "envelope", which represents the entire general area of the subject on the page. Once the largest areas are formed, smaller angles are found within using the same manner. As you work, the angles become increasingly segmented with more straight lines, breaking up the larger lines you first placed on the image.The concept is rather simple and seems pretty easy to learn.
Anthony Ryder has a great tutorial with photos HERE. Also, Sadie has an excellent figurative example on her website, which can be found HERE.
Also, a good book for this method is Juliette Aristides, "Lessons in Classical Drawing: Essential Techniques from Inside the Atelier".
**********************************************
Construction
All forms of construction are non-observational and at the same time based on truthful principles that exist in Nature. For instance, perspective in a landscape is construction, plotting out shapes of vessels in a still life is construction, creating a system of forms of the the human body is construction. Construction can also be entirely a creation of the artist, like model sheets of characters that are typically used in animation and other illustration.Before I met Sadie, I had never used construction or perspective to as great a degree in my still life paintings. I had mainly used construction in my job as an illustrator, where I need to rely on the method for creating landscapes, objects and figures from imagination. I was surprised to find that I also found construction of vessels the best way of approaching man made subjects in an observational painting rather than just relying on a straight line block in. Creating an ellipse is simply more precise when created using construction. If there are irregularities in the object, those can be added afterward using observation. Additionally, when I recently took a perspective course with Carl Dobsky, he mentioned that he uses perspective to create accuracy in his compositions - which makes perfect sense.
Some of the most popular instruction regarding constructing the figure from life or imagination come from George Bridgman, who taught at the Art Student's League. Some of his most famous and influential students include Norman Rockwell, Robert Beverly Hale, Frank Reilly, and Andrew Loomis, among many, many others. George Bridgman studied under under painter and sculptor Jean-Léon Gérôme at the École des Beaux-Arts in Paris, and later with Gustave Boulanger.


These are two pages I scanned from Constructive Anatomy by George Bridgman. They demonstrate the masses and movement of the body.
Other instructors of note that use construction methods include Frank Reilly, Glen Orbick, and Glenn Villppu, and Andrew Loomis. Most of these instructors combine other methods into their teaching but also use construction as a way to think about drawing.
For example, below is the Frank Reilly approach of constructing a figure. Here you can see the general idea of how the forms are broken down into parts that, when memorized, can aide in drawing a subject from memory.


The ideas of construction can also be applied to all kinds of subjects. Often scientific illustrators or artists who create creature designs (usually termed Creature Designers) for film need to use construction methods in order to flesh out their subjects, since often their subjects are either not available to study, or in bits and pieces, or are completely made up. A great example is the work of artist Terryl Whitlatch, whose work can be seen HERE. One of my very favorite books for constructing botanical subjects is "Botany for the Artist" by Sarah Simblet.
**********************************************
The Loomis Method
Andrew Loomis was a highly regarded commercial illustrator who was prominent in the 40′s and 50′s and taught at the American Academy of Art in Chicago, where he lived most of his life. He authored several how-to books on drawing and painting that are now classics. Many artists from a wide array of genres have used the Loomis Method; often how-to books obscure the original source of this approach which is often derived from Loomis's teaching.
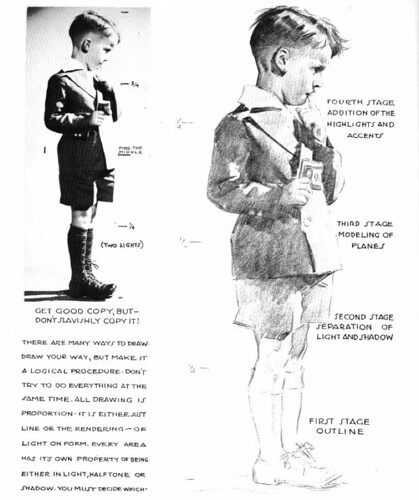
In his book, Fun with a Pencil, published in 1939, Loomis describes proper lighting and the deconstruction of complex shapes in different perspectives. He also explains that a successful drawing must have ten fundamental laws, which he divides into two categories, called the five P's: Proportion, Placement, Perspective, Planes and Patterns and the five C's: Conception, Construction, Contour, Character and Consistency.
To illustrate, here is a sample page from Creative Illustration that I had pinned up on my wall for many years:
to download online copies of Andrew Loomis's excellent art instruction books, click HERE.
**********************************************

Everything that is alive is growing, evolving - pushing out. When something is no longer alive, it collapses and pushes back in, creating convex curves in the organic subject. Also, interestingly, the height of these convex curves is rarely, if ever, in the middle - the apex is always offset.
There is more information about curves here:
http://www.cgsociety.org/index.php/CGSFeatures/CGSFeatureSpecial/opposing_curves
and here (this is a great article):
http://www.wetcanvas.com/Articles2/25315/686/


 Rembrandt van Rijn, Study for St. Jerome Reading,1652
 Leonardo da Vinci, Study for the Trivulzio Monument, 1508
(source article here)
**********************************************
Further development in the art of the caricature came with Walt Disney's animated movies and short films, as well as cartoons he published. He employed many artists, famously "the nine old men", who propelled this craft and are still influential to many character artists today. Disney encouraged his artists to study human and animal movement - not to duplicate reality, but to use it as a foundation for convincing fantasy.
"The point must be made clear to the men that our study of the actual is not so that we may be able to accomplish the actual, but so that we may have a basis upon which to go into the fantastic, the unreal, the imaginative - and yet to let it have a foundation of fact, in order that it may more richly possess sincerity and contact with the public. A good many of the men misinterpret the idea of studying the actual motion. They think it is our purpose merely to duplicate these things. This misconception should be cleared up for all. I definitely feel that we cannot do the fantastic things, based on the real, unless we first know the real."
- Walt Disney to Don Graham, December 23, 1935.
My favorite of the Disney classic films is Pinocchio, released 1940. Below are some great examples of caricature art that was used in the production of that film. These photos are not the greatest. I wanted to post them because they are personal favorites and demonstrate the concept so well. They were taken at the Disney Family Museum in the Presidio, San Francisco. It was not clear who sculpted these maquettes or drew the drawing below.


**********************************************
One of the best examples with historical precedence is Manga, a visual language that has become a tradition in Japanese culture. Artists will memorize established symbols and use them to create their own characters and narratives. Additionally, some artists will use this style as a basis for creating a new style.
"Eye shape and size can be exaggerated or changed altogether. Love-hearts and doe-eyes indicate an infatuation, while stars indicate that the character is star-struck. Spirals indicate confusion or dizziness, while flames or wide empty semicircles indicate that the character is angry or vengeful. When dead, unconscious or stunned, "X"s are sometimes used as an indication of the state. Eyes may be replaced with two "<"s facing in opposite directions to represent a variety of emotions, such as nervousness or excitement. Eyes without pupils and reflective glints indicate a state of delirium." - wikipedia

It makes sense that an art form based on symbols has risen up naturally, given that writing and language itself are forms of symbolic communication. Likewise, as children, when we first learn to draw, we create symbols of the world around us which are universal. As artists grow from childhood, some begin creating their own visual symbols that characterize their specific expression. Symbolic drawing becomes even more sophisticated as the artist develops ways of getting the viewer to relate to and understand what is being expressed and can become quite refined as in the example above.
**********************************************
In his book, Fun with a Pencil, published in 1939, Loomis describes proper lighting and the deconstruction of complex shapes in different perspectives. He also explains that a successful drawing must have ten fundamental laws, which he divides into two categories, called the five P's: Proportion, Placement, Perspective, Planes and Patterns and the five C's: Conception, Construction, Contour, Character and Consistency.
To illustrate, here is a sample page from Creative Illustration that I had pinned up on my wall for many years:
Summary: First draw the subject with line only not using curved lines, but straight lines. Then lightly indicate the shadow line that separates the light and the dark, following the form. Second, fill in the shadow areas with one value. Third, soften the transition between light and dark by modeling the planes, fourth, hightlights and dark accents.
**********************************************
Organic Structure Theory
When I took Sadie's oil painting class II, she handed out a print out of this theory of organic structure, which concepts I was vaguely aware but had not realized it encompassed an entire way of thinking about drawing. I have since incorporated Organic Structure concepts into my thinking. The idea is that life is always pushing out, growing, expanding, twisting, curving. This in turn influences the way we think about how muscles fit together, how to draw them, and think about them. The same is true for all organic life.
Anthony Ryder has a good amount of information for further reading on his website, article found HERE. Also, Ted Seth Jacob's book, Dictionary of the Human Form, documents and explains how the body is a highly organized organic creation with complex interactions using these principles.
Anthony Ryder has a good amount of information for further reading on his website, article found HERE. Also, Ted Seth Jacob's book, Dictionary of the Human Form, documents and explains how the body is a highly organized organic creation with complex interactions using these principles.
Convex Form
Everything in nature is curved and fluid; nothing is flat and angled unless it is non organic. All organic curves are convex, not concave. If you look closely at a seemingly-concave drape or indentation, you can always see very small convex curves along it.

Everything that is alive is growing, evolving - pushing out. When something is no longer alive, it collapses and pushes back in, creating convex curves in the organic subject. Also, interestingly, the height of these convex curves is rarely, if ever, in the middle - the apex is always offset.
There is more information about curves here:
http://www.cgsociety.org/index.php/CGSFeatures/CGSFeatureSpecial/opposing_curves
and here (this is a great article):
http://www.wetcanvas.com/Articles2/25315/686/
Wide to Narrow/Tapering
Nothing in nature is parallel, every shape starts wide on one end and gets narrow on the other. A shadow shape will always be a fan, not a square or rectangle. Use this concept to "shape the light".

Nothing in organic structure mirrors the other side in a symmetrical manner - ever. Nature grows and pushes out in a way that creeps along curving asymmetrically. Look at a tree trunk for an example of this. A lot of people will draw that as a straight trunk, but when you look closely at the way it grows, it is a spiraling asymmetrical curve.
Rounding and Ending/Spirals
Every shadow rounds over a curved surface and ends before the next form begins. Every shadow has a soft edge and a hard edge. Think about the direction of the light - generally the edge of a shadow closer to the light source will be soft, and the edge away from the light will be hard.

What's in Front/ Interlocking
The only point on an object not foreshortened is the point directly in front of your eye, everything else is foreshortened. Every form interlocks with another form, overlapping.

**********************************************
Gesture Drawing
This method uses a loose gesture with sweeping lines that attempts to find the action or energy of the subject and is not necessarily literal to the subject. The idea is to loosely suggest the overall movement and shapes of the subject. Artists have used gesture for centuries.

(source article here)
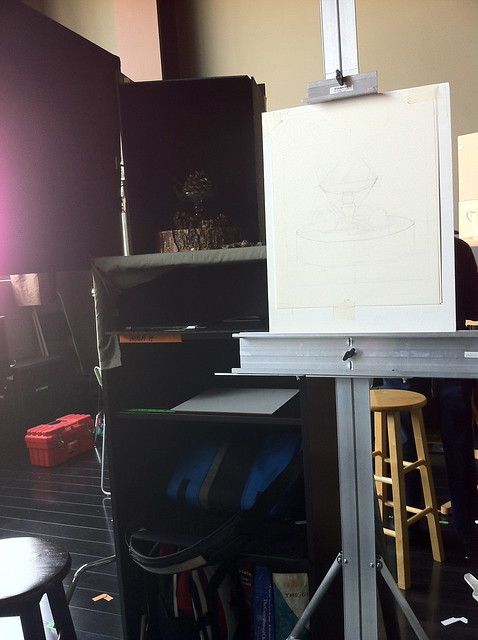
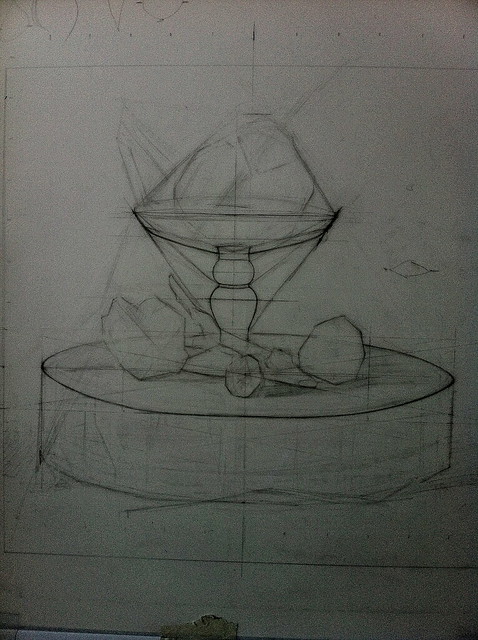
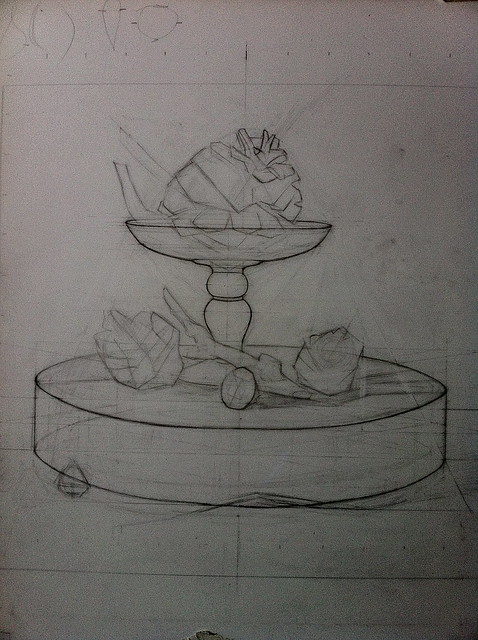
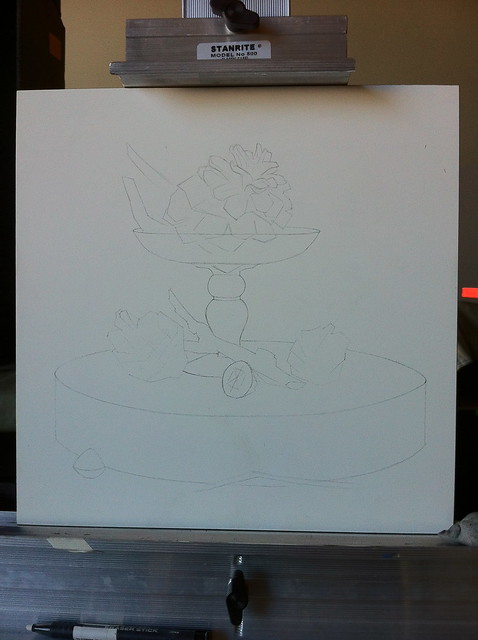
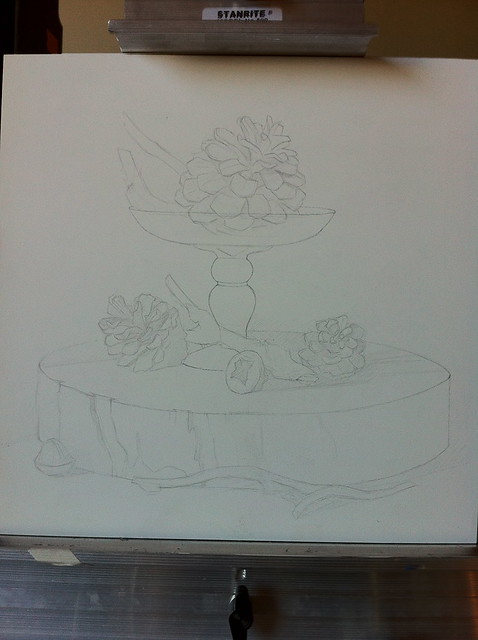
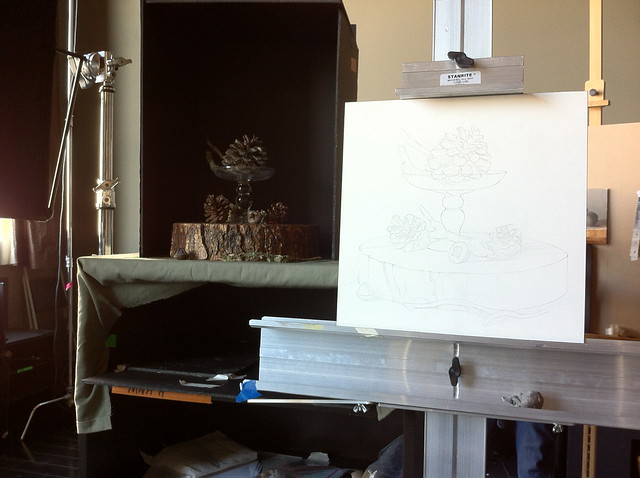
The method usually starts with drawing the "line of action" which conveys the over all direction of the pose. Afterwards shapes that represent the head, ribcage and pelvis are hung on the line of action. If the subject is not a figure, the same plan can work by using a line of action to find the main direction of the shape. In my current still life I am painting in Sadie's Advanced Open Studio, I used a line of action to find the direction of the pine cones and then loosely sketched out where the rest of the outer edges of the shape seemed to exist before I found actual angles.
Also, from my own experience in sculpting, we shape our armatures in a gesture of the pose before placing any clay on the form - a critical step that adds to the sense of "life" of the subject when adding structure later. I have even found that the more I exaggerate the armature's gesture, the better sense of movement that sculpture will have in the final results.
Also, from my own experience in sculpting, we shape our armatures in a gesture of the pose before placing any clay on the form - a critical step that adds to the sense of "life" of the subject when adding structure later. I have even found that the more I exaggerate the armature's gesture, the better sense of movement that sculpture will have in the final results.
Here is a pretty good tutorial for gesture drawing human figures:
Caricature
Caricature is a semi-observational method of drawing that intentionally distorts the subject in order to expose that subject's internal character. Some of the earliest caricatures are found in the works of Leonardo da Vinci, however Honoré Daumier (1808–1879, French) is regarded by many to be the grandfather of the art of Caricature.
Here are a few examples of Daumier's political sculptures which he made for himself to use in paintings.

and here is a beautiful drawing, also by Daumier:

Here are a few examples of Daumier's political sculptures which he made for himself to use in paintings.

and here is a beautiful drawing, also by Daumier:

Further development in the art of the caricature came with Walt Disney's animated movies and short films, as well as cartoons he published. He employed many artists, famously "the nine old men", who propelled this craft and are still influential to many character artists today. Disney encouraged his artists to study human and animal movement - not to duplicate reality, but to use it as a foundation for convincing fantasy.
"The point must be made clear to the men that our study of the actual is not so that we may be able to accomplish the actual, but so that we may have a basis upon which to go into the fantastic, the unreal, the imaginative - and yet to let it have a foundation of fact, in order that it may more richly possess sincerity and contact with the public. A good many of the men misinterpret the idea of studying the actual motion. They think it is our purpose merely to duplicate these things. This misconception should be cleared up for all. I definitely feel that we cannot do the fantastic things, based on the real, unless we first know the real."
- Walt Disney to Don Graham, December 23, 1935.
My favorite of the Disney classic films is Pinocchio, released 1940. Below are some great examples of caricature art that was used in the production of that film. These photos are not the greatest. I wanted to post them because they are personal favorites and demonstrate the concept so well. They were taken at the Disney Family Museum in the Presidio, San Francisco. It was not clear who sculpted these maquettes or drew the drawing below.


**********************************************
Symbolic Drawing
This method departs entirely from reality. The artist uses a series of visual symbols that represent things we are familiar with, like eyes, noses, mouths, body parts, etc. These representations are entirely the creation of the artist. Many cartoonists and comic book artists use this system of drawing.One of the best examples with historical precedence is Manga, a visual language that has become a tradition in Japanese culture. Artists will memorize established symbols and use them to create their own characters and narratives. Additionally, some artists will use this style as a basis for creating a new style.
"Eye shape and size can be exaggerated or changed altogether. Love-hearts and doe-eyes indicate an infatuation, while stars indicate that the character is star-struck. Spirals indicate confusion or dizziness, while flames or wide empty semicircles indicate that the character is angry or vengeful. When dead, unconscious or stunned, "X"s are sometimes used as an indication of the state. Eyes may be replaced with two "<"s facing in opposite directions to represent a variety of emotions, such as nervousness or excitement. Eyes without pupils and reflective glints indicate a state of delirium." - wikipedia

Naoko Takeuchi's Sailor Moon
It makes sense that an art form based on symbols has risen up naturally, given that writing and language itself are forms of symbolic communication. Likewise, as children, when we first learn to draw, we create symbols of the world around us which are universal. As artists grow from childhood, some begin creating their own visual symbols that characterize their specific expression. Symbolic drawing becomes even more sophisticated as the artist develops ways of getting the viewer to relate to and understand what is being expressed and can become quite refined as in the example above.
Final Thoughts
If I were to create a spectrum of drawing methods, I would place sight size on one end and symbolic drawing on the other. Methods based on literal realism train the artist to break the internal ideas of how we think we see the world, and symbolic drawing pulls from the internal visual language that artist has developed. Many artists use a combination.
Each is a profound choice in how to see the world, each equally as valid. I find none of these methods lesser or more important than one or the other, rather each way a choice, a different way to see and think based upon the intention of the artist.
Each is a profound choice in how to see the world, each equally as valid. I find none of these methods lesser or more important than one or the other, rather each way a choice, a different way to see and think based upon the intention of the artist.
My next post is part three of the Advanced Open Studio class with Sadie - open grisaille.
If you made it this far, THANKS for reading! :)
If you made it this far, THANKS for reading! :)