Pages

Showing posts with label Sadie Valeri Advanced Open Studio. Show all posts

4/13/2014

My Latest Studio Work/Progress on Final Color Pass


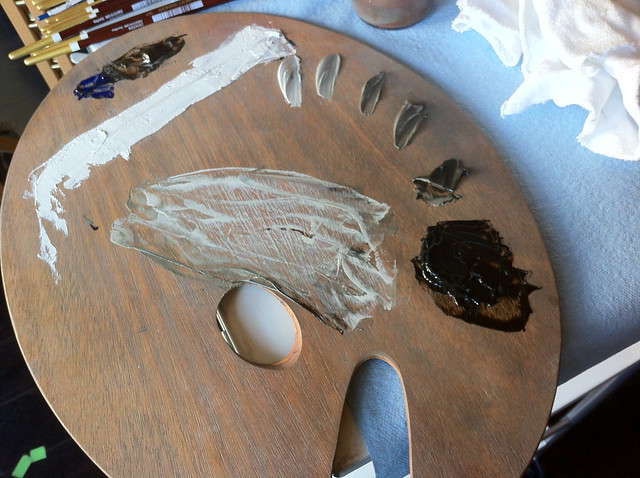
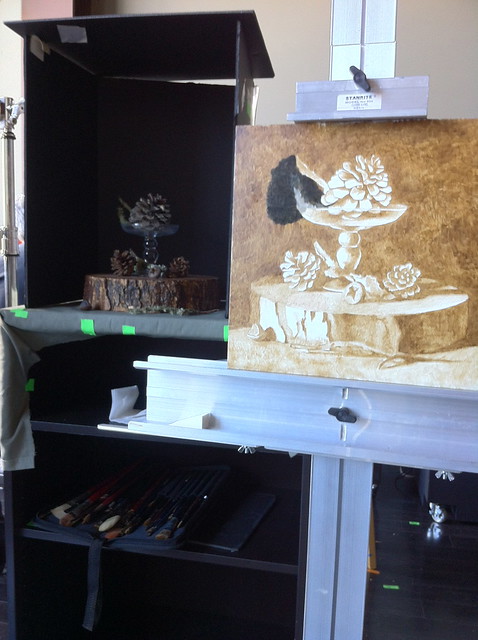
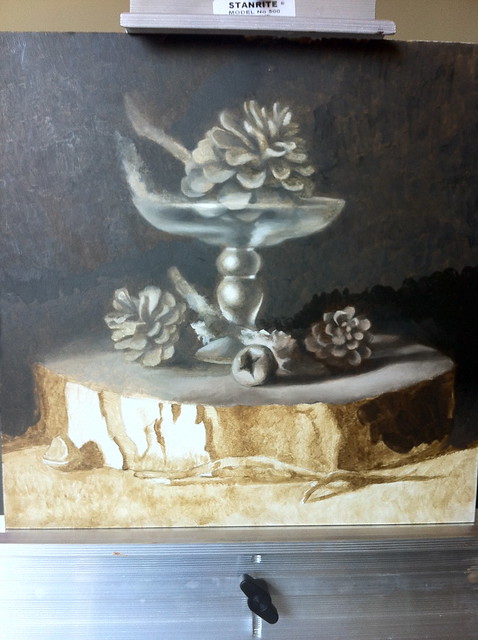
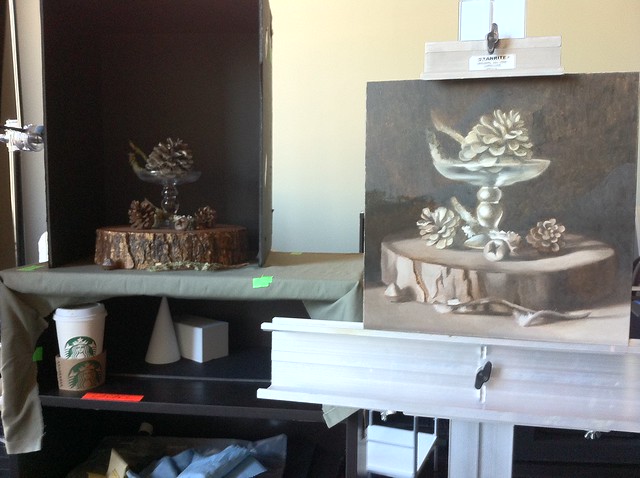
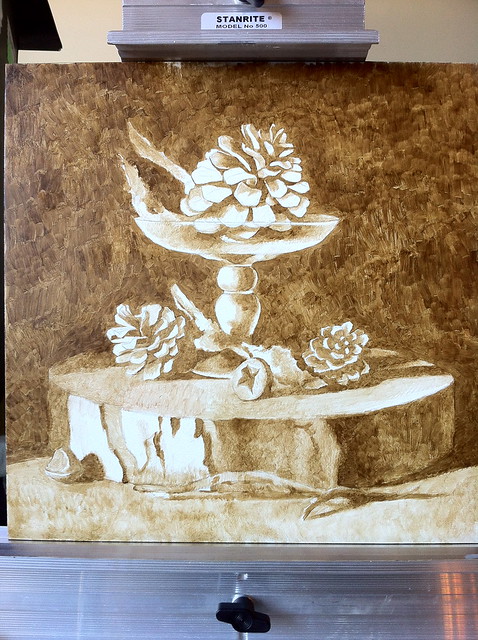
First session after finishing the initial color block in stage. I spent most of this session looking at the value relationships between the white of the vase (which was really a very warm-grey), the white of the board the entire set up is sitting on, the white of the flowers and the white of the butterfly. I spent a good deal of time in this session comparing between the four white areas, trying to see what the difference between them was. 


 I focused first on the flowers. In the first color block in, I felt that the shadow areas were getting a little too dark and muddy, when what I wanted was luminous colors even in the shadow areas. I painted over all of the shadow areas of the flowers and strengthened the white areas. I also pumped up the contrast on the yellow flower stamens.


**************************************************
Second session of the final color pass:


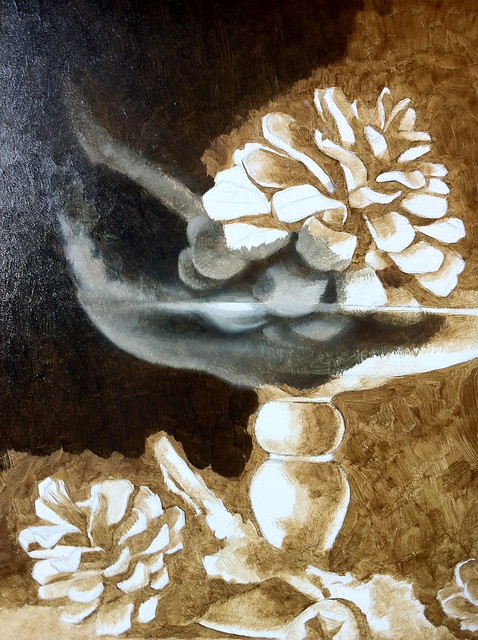
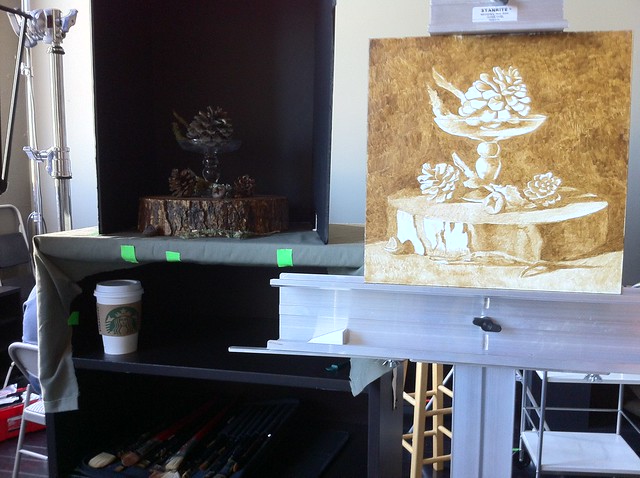
The focus of this session was on the butterfly held up by twine. The butterfly is made of white feathers, paper mache in the body, and has iridescent glitter all over the wings, making it a difficult challenge.


Sadie suggested that instead of painting each and every little dot of glitter, that I paint large swaths of blurry color - the shapes of the areas instead of pieces. I also remembered a passage in James Gurney's book, "Color and Light" about painting scales on a dinosaur. Instead of painting all of the texture everywhere, he recommended only painting the texture in the light, and especially in the highlighted area. As the textures moves into less illuminated areas of the form, it will become less and less apparent to the eye.


This was as far as I chose to push the glittery iridescent areas of the butterfly. In the next few sessions during the final pass I will revisit both the glitter areas and the string. 

**************************************************

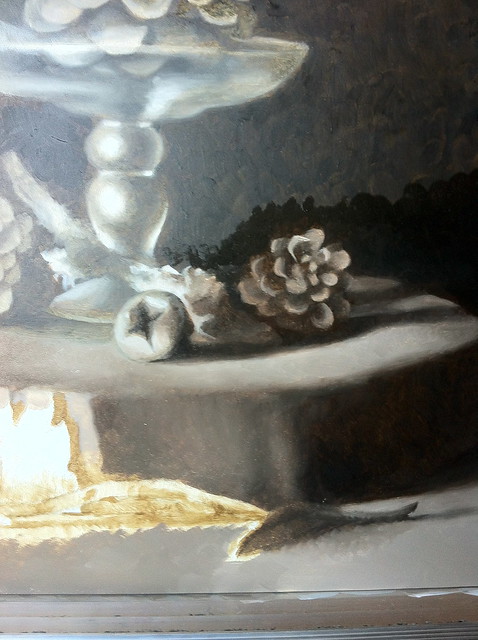
Third session of the final color pass:


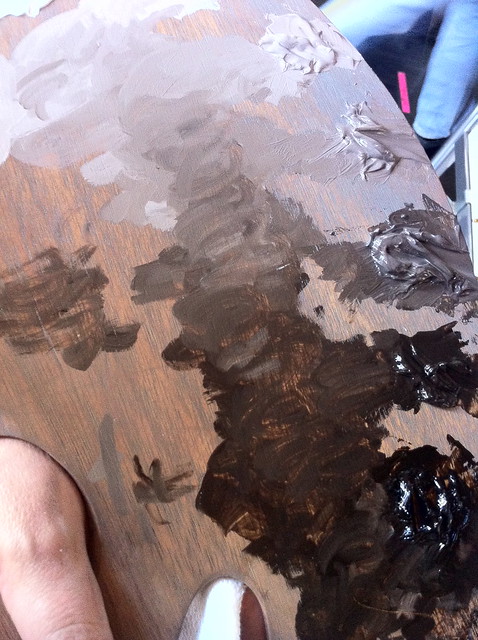
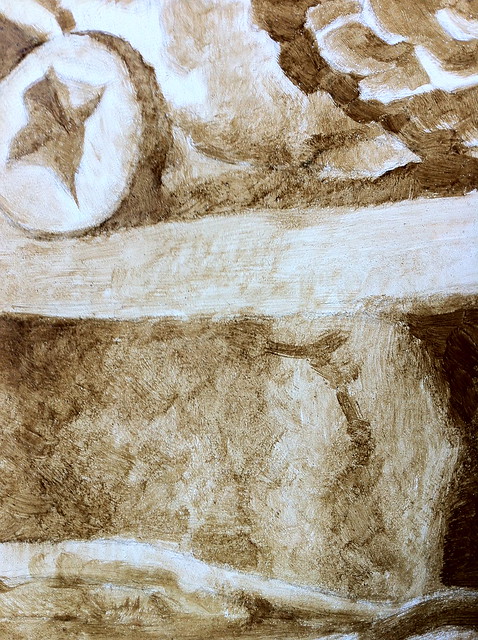
I spent almost this entire session working on the pattern on the vase and the color shifts in the shadow areas of the white areas in the vase. 

I often struggle painting white objects. As I am observing the scene in front of me, I can clearly see the light area vs. the shadow side. But when I've sat and observed these same objects over a long period, like today's five hour session, my eyes begin to pick up the subtle hue shifts, bounce colors and variation in the value. 


In the past when I'd worked in the alla prima method (direct wet on wet painting) I would just simplify these areas for the sake of turning the form, with the brush work always on stage, so to speak. The Flemish indirect method, on the other hand, provides the opportunity to get the subtle variance of the light on the form by building up layers and layers of paint. With layering, you can push and pull areas into and out of focus, glaze areas, and continue to soften or sharpen edges endlessly. All of this makes it challenging to make decisions. I've resigned to working out the "mood" of each area in relation to the whole piece.


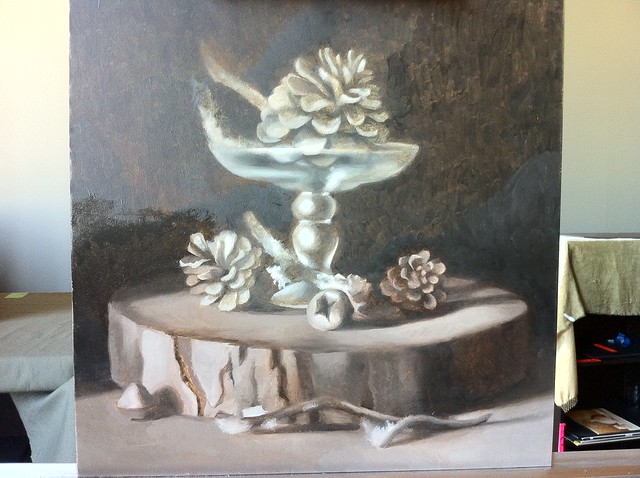
For the final finishing details in the next 2-3 sessions, I plan to work on the gradient of the blue-green in the  background. Working over many sessions, the color in the background has begun to creep a little. Some areas are not matching previously painted areas. That happens because each session I am working on a specific area and need to mix up the surrounding background paint color so that I can soften the edges.

In the next few sessions, I will work on smoothing out the hue shift and the shadow areas so that it is a little more harmonious. I might also make the green-blue a little more saturated. The flowers still have a few textures and details that are not yet depicted, and the glitter on the butterfly is not quite there yet. Last but not least, the pattern on the vase…is it too dark? I will most likely add a light glaze of vase color on top of the pattern in the center so that it does not call itself to attention so much.

Thanks for reading!


3/15/2014

Latest Studio Painting/1st Color Pass Finished

Sunday is my painting day. I paint from about 10 am until 4 pm, using that time as efficiently as I can. I put on my headphones, crank up the latest history lecture I've been absorbed in, and paint. My painting space currently is one of the still life stations at Sadie Valeri's Atelier, which has excellent light and overall great art vibes. I really enjoy watching new students learn and go through similar trials and tribulations I went through as an art student. The dedication and determination is so concentrated that it permeates the air and makes me feel motivated all week long. It is an experience I feel fortunate to be a part of. 


This past week I finally finished the first color pass on my latest still life painting. This pass is about establishing the main color relationships in general terms rather than details. At this point, I will go into the fine details and creating areas of focus.  Below is a series of process images from the closed grisaille state into the 1st pass color stage.


The finished closed grisaille, the 2nd underpainting that establishes a full value range. Although as an alla prima painter by training I've never separated out the value stages in this way, I've found that painting the grisaille has enhanced my understanding of how deeply value relationships are tied to color. 


Beginnings of the color pass. There is a subtle range of color going on in the light areas of the flowers. Instead of focusing on those colors, I've painted them pure white in this first color pass. 


 In this stage I am also focusing a lot on the edges of things, making edges very blurry instead of sharp in any one area.


The details on the vase are painted very softly on purpose. Later when I work on the final color pass, I will sharpen up the detail where needed, including the highlight area which falls over the flower details of the vase.


Notice how blurry the edges are all around the subject. In fact, I probably should have painted them even softer. 


After the flowers and vase hues were painted, I began working on the hue shift in the background area from the bottom left up toward the top right. This is not necessarily a smooth transition in the actual set up, but an improvement in the light pattern that I felt worked better for the composition than what is actually happening in reality.


As I moved toward the butterfly and the shadow underneath it, I roughed in the color in very simple terms making sure to leave the edges extremely soft. The tricky part of this area is going to be the glittery, shimmery surface of the wings, which are feathers that have glitter applied to them. Instead of painting all of that detail, I just noted general colors and made the upper right area pure white.


The finished butterfly. I sharpened up a couple of areas in the light, but left the rest very soft.


The finished first color pass. As you can see the background gradient is still quite rough, as are patches in the vase and flowers. All of this will be addressed in the next stage as I refine the painting.

***********************************************************************

Meditations on Still Life Painting


 The subject matter in my painting is a little odd, I know. When I set it up, I had been thinking about the fantastic dioramas in the Chicago Field Museum and thought I'd try recreating that feeling of an artificially arranged environment. Instead of using real flowers in my set up, I crafted paper flowers which I dipped in wax to preserve their shapes. Likewise, the feather butterfly is not a real preserved butterfly, but is instead crafted. I chose to show the way I set up the still life by including the string, clothes pin and tape so that the viewer knows this is a set up and is not real.

As a modern viewer of any still life painting, the audience knows that the subject has been set up by the artist, every detail carefully composed, including the direction of the light. We have a relationship to narrative painting that is different than it was in the past.

Dioramas from the Field Museum in Chicago. Taxidermy animals displayed in an artificial environment  made to look real, depicting a certain narrative of a scene that might have occurred in real life. The images in the far background are realistically painted murals. The foliage and tree branches are silk, wood and painted plaster.


Originally, still life arrangements were not seen with the same eye as we see them now. Natural History dioramas and still life paintings were similar in that they were narrative arrangements that represented a story to the viewer about something not widely known about the world, like animals on the plains of Africa or they were representative of religious beliefs or values like in many of the Flemish still life paintings of the 16th century. Viewing these depictions in our modern era, we know more about these subjects due to availability of travel, familiarity brought to us by stories told in film, the wide use of photography in remote places, and globalization via the internet. As a result, the still life in the traditional sense now holds less importance to us as an informative vehicle than it has been in the past. 


And yet, I am an artist in this modern age who has a desire to paint elaborate and narrative depictions in the still life format, creating the cart before the horse, so to speak. I wonder if in our modern era the tradition of still life painting can bring to us something of equal value or perhaps something new and different. It is a question I am thinking about a lot as I work on this painting. 

6/28/2012

Advanced Open Studio with Sadie/ Part Four

In my previous post I finished the first under painting layer, the open grisaille, as part of my instruction at Sadie J. Valeri's Advanced Open Studio. After the open grisaille dried, I moved on to the closed grisaille.

When I first learned about the Flemish method's multi-step process, I did not understand the reasoning behind making a neutral tone underpainting, thinking it laborious, especially coming from an alla prima direct painting background where painting is quick and results immediate. However, after going through the steps, doing a lot of reading and research, talking with Sadie, visiting museums, seeing Sadie's paintings and other classical realist paintings, I have come to realize my painting education has been incomplete. The closed grisaille has been pivotal in not only understanding value ranges and creating luminous color, but also in opening my mind to the incredible painting processes that existed before Impressionism.
 ************************************

Closed Grisaille


The purpose of creating an under painting is to bring the values, (the black and white tonal range) of the subject closer to reality. Sadie described it to me as becoming 50% closer to reality with each successive layer that we work on. In the first layer, the open grisaille, we broke down the shadow vs. light areas. In the second layer we make a full value opaque tonal painting, which acts to prepare for the color layers and, in addition, aides in creating luminosity and softness in the color stage.

From Adrian Gottlieb's online glossary: "Underpainting:  Also called dead coloring, under painting was once one of the most commonly used techniques in oil painting but fell into almost total disuse among contemporary painters. 
From the beginnings of oil painting, under painting has been an essential stepping stone which permits the painter to rapidly define composition, lighting and the atmosphere of his or her work. Under painting is the painter's guide through an often long and laborious process that allows the painter to develop a clear vision of the overall sense of the painting although it is usually entirely covered by successive paint layers.
[Generally] under painting consists of painting a monochrome version of the final painting.  Under painting is part of a step by step method that was common practice among European painters and is still taught at ateliers and academies teaching historic techniques and methods today."

Richard Frederick Lack:  "A mixture of Flake White, Ivory Black or Mars Black and the addition of a small amount of Raw Umber for warmth are all the pigments necessary for a grisaille study." ***note: in Sadie's studio study we are using titanium white, burnt umber,  and ultramarine blue.

There is a pre-order of Jon deMartin's dvd on closed grisaille painting, which promises to be be an excellent resource. Check out the preview HERE. (available for purchase on July 3rd, 2012 - I think I will order this one!)

 ************************************ 

Historical


During the 12th through the 13th centuries and possibly earlier, grisaille painting was used in stained glass mainly as a decorative addition to the colored glass. Some grisaille painting was also used in narrative panels in churches throughout Northern countries such as France, England, the Netherlands.

Two Grisaille Panels, 1320–1324
French; Paris, from the Chapel of Saint-Louis, north aisle, royal abbey of Saint-Denis
Pot-metal and white glass, silver stain.

At this time, grisaille was also used in the southern countries of Europe in plaster fresco painting to imitate bas relief sculpting in everything from churches to civic buildings, particularly in Italy.


The 15th century Flemish oil painting method incorporated grisaille, as discussed in the previous post by Jan van Eyck, also a period sometimes referred to as "Early Netherlandish Painting".

Later, grisaille was used by many of the 19th century French academic painters, like Ingres, as in the example below, who were intrigued by Flemish painting methods.
 Odalisque in Grisaille, ca. 1824–34
Jean-Auguste-Dominique Ingres (French, 1780–1867)

Today, many modern Realist artists also make use of the grisaille. It can be beautiful in and of itself; some artists use a combination of grisaille and glazing. For study purposes it is a useful method for training the eye to see value ranges, and is often taught for cast painting and figure painting in a classical ateliers. Check out this link for a beautiful Colleen Barry partially painted closed grisaille with the open grisaille exposed underneath, HERE.

 ***********************************

Method


This stage continues to make use of underpainting medium as a way to make the paint flow if it is not fluid enough. However, I found that I rarely used it, probably only a few times at the start, and not very much. In my last post I neglected to mention the recipe of the underpainting medium. Here it is:

Recipe: 2 parts linseed, 1 part odorless turp

***note: use fine sharpie to mark parts on side of glass, mark top of jar "underpainting medium". I am using ball canning jars.


Use either Turpenoid or Gamesol brand Odorless Mineral Spirits. There are many linseed oils available.


************************************ 

Value String


The purpose of mixing up a value string is so that you don't have to mix up values on the fly while working. It saves a lot of time to premix seven values moving from pure white to black, as you can see in the photo below. Sadie instructs us to use seven values, which I find to be more than enough to describe the tonal range of any given subject.

When I first mixed up my value string, I made the values much too cool, using far too much ultramarine blue in the mix. Sadie told me that the value string should lean more towards burnt umber rather than ult blue. Apparently when the under painting is too cool it will create an unattractive pasty effect that is difficult to deal with in the color stage. Also, in a cool North light situation, the light areas will always be cool while the shadows are warm; the warm tinted underpainting ensures the shadows will always have "life" and warmth.

IMG_2621

Also notice how the white paint is spread out in a thin strip. This is so that I can get clean pure white when I need it. Below is what the color looks like after I've been painting awhile. You can see how warm the neutral grays are.

IMG_2662

************************************ 

Technique


***note: There is an unfortunate glare on some of my photos due to very strong light in the studio. Hopefully you can get a general sense of the scene. I will try to improve my photos for the following posts.
 
I didn't really know where to begin, so I started on the easiest, the very dark, almost black background against the lighter pinecone, which is the focal point of my painting. The two sticks that move into the dark area are covered with lichen and heavily textured. Sadie instructed me right away to paint these almost blurry, soft and to avoid all detail, focusing only on the general effect of the value on each area against the black background.

IMG_2587

In my last post I used the underpainting medium more often, dipping the edge of the brush into the medium and then sopping up the excess with a paper towel. In this stage, it is not necessary to do that since the paint will be opaque. The point is to get the paint to flow off the brush and on to the panel, but not have it so fluid that it is transparent and drippy. Most of the time I did not need more than a tiny bit on my brush. Once that bit was mixed into my paint as I worked, the paint seemed to be fluid enough to continue to work for quite awhile. 


IMG_2588

It took me awhile to get used to painting this way. I wanted to get into every little value shift and fully describe everything. Sadie pushed me to move on quickly. In fact, Sadie instructed me to make all of the painting soft with no sharp edges anywhere in the painting, at all, setting up the painting for selective focus in later color layers.
I wasn't able to finish very much of the grisaille that first day and had to stop. Sadie instructed me to avoid stopping for the day on a contour, explaining that paint will form a hard edge when it dries, making it difficult to soften in the next session and in later layers.

IMG_2596


IMG_2597


Unfortunately, that is exactly where I stopped for the day. As a consequence, I will have some difficulty in making those edges soft. This is what practice is for, though!

************************************ 

Next Session


I began the next session by applying a very thin coat of linseed oil on the open grisaille, taking care to not apply too much as the the oil will slowly drip. To make sure I did not apply too much, I wiped off the coat of oil with a blue "shop cloth", which made the layer extremely thin.

The highlights on the glass piece are in reality MUCH smaller than they are depicted here. Sadie instructed me to make a large "glow" around the highlights, blurring out the edges so that in later stages I can work up to making the highlight soft and luminous, working up to the point of light rather than dotting on opaque paint. 

IMG_2626

IMG_2630

It is difficult to leave the highlights so large knowing they are not like that in reality. They jump off the panel every time I look at this underpainting, forcing me to be patient for the subsequent layers.

IMG_2633

After painting the glass and the pinecones, I began working on the heavily textured tree slice that I am using as a base. Sadie told me that instead of worrying about all the texture, to just paint the large value shifts from one end to the other, capturing the effect of light and keeping the edges soft.

IMG_2657

In this photo below you can see how small the highlights are on the glass pedestal. Also note how transparent the shadows are in the painting.

IMG_2658

Sadie instructed me to paint the left side of the tree trunk base lighter than the value actually is. I painted the entire left side around a value 2 or 3 in order to get a sense of light in the painting. Also, instead of painting the shadow areas opaquely, they are painted thinner with less paint. I concentrated on opaque lights rather than building up a lot of paint in the shadows.

IMG_2660

Below is finished closed grisaille underpainting. Because I worked on the grisaille more than one day, my warm-grays do not match precisely, even though I tried to be accurate when I mixed up my value strings. Since the underpainting will be completely covered, this will not matter, as long as the passages lean toward the warm rather than cool.

IMG_2683

IMG_2682

I had about a week in between sessions. The painting was quite dry by the time I began the color. If painting at home continuously, make sure the grisaille is completely dry, either one or two days, depending on the humidity. Do not start the color layer if the grisaille is not dry.

**********************

Please stay tuned as I move into the color stages and share my research notes! Thank you for reading!


6/10/2012

Advanced Open Studio with Sadie/Part Three

Continuing on from my last few posts, after I transferred the drawing and varnished it, I began on the open grisaille, the initial application of paint on a white panel, which I documented in detail below as a part of Sadie J. Valeri's Advanced Open Studio.

Before I was introduced to a classical realism, I was completely unaware of the term "grisaille". My fantastic oil painting teacher at the at the American Academy of Art, Ted Smuskeivich, introduced us to an under painting technique which uses a warm earth color painted loosely connecting all the shadow areas in one continuous tone leaving the white of the canvas open to represent the light areas. Even though he did not call this method an open grisaille, I recognize now that is what it is.

It has made me think that there must be many adaptations of the grisaille. My watercolor teacher, Irving Shapiro (who was also the Director of the school), used an under painting method of sorts, painting all the shadows as one large connected shape with warm color transitions in the shadows, painting the lights last. I am sure there are more adaptations and variations out there. I have often read about warm under paintings using different mediums underneath the oil, like acrylic paints and even egg tempera.

 At Sadie J. Valeri's Atelier we are learning the full classic method, called the Flemish Technique, which consists of many layers of paint, starting with the open grisaille. The Flemish Technique developed in the early Renaissance when artists were looking for paints that could be manipulated more finely than the quick drying egg tempera. After oil painting in this manner was introduced by Jan and Hubert Van Eyck in the early fourteenth century, it's popularity spread throughout Europe. To read more about the Flemish method and it's cousin, the Venetian method, HERE is an excellent article by Virgil Elliot and a link to his book on classic oil painting HERE.

The Ghent Alter Piece, Jan and Hubert Van Eyck, 1432
HERE is an excellent website that allows you to select each panel and zoom in to see amazing detail on the paintings. Check it out!

******************************************************************

What is "grisaille"?


From Adrian Gotlieb's online glossary: "Term applied to monochrome painting carried out mostly in shades of grey. The use of the French word can be traced only to 1625, since although grisaille painting was done in preceding centuries, it was not referred to as such...at the time of it's origin, in the medieval period, grisaille painting was simply called 'painitng in black and white'"

Grisaille painting was commonly used in the medieval period to imitate bas relief sculpture. In the Flemish oil painting technique, the grisaille functions as an underpainting, first painted transparently in a warm hue that leaves the canvas exposed in the light areas, termed the "open grisaille" and afterwards a second pass termed the "closed grisaille" is painted in opaque warm neutral greys before the final pass of the color layers. This blog post focuses on the open grisaille that I am learning during Sadie's Advanced Open Studio.

******************************************************************

Open Grisaille

Clean brushes before beginning:

Sadie introduced us to this excellent system of cleaning brushes. This is all new to me. In the past I simply washed my brushes with odorless mineral spirits in between color changes and then used dish soap at the end of the day to clean my brushes. There is a better way to clean brushes - Natural Turpenoid!


I filled a silicoil jar with natural turpenoid and have been using it to wash my brushes at the end of the day, leaving the turpenoid on the brushes. However, it is VERY important to remember when you next begin to paint to clean the natural turpenoid OFF of the brushes before you paint; this stuff is designed to strip paint off and not something you want IN your painting! It is ok to leave the natural turpenoid on the brushes overnight because it will  actually protect the brushes. When ready to begin painting, wash your brushes in odorless mineral spirits to make sure they are free of natural turp.

******************************************************************
 Brushes: 

From Sadie's painting materials list: "I highly recommend Robert Simmons “White Sable” brushes with the maroon handles and white bristles, the very best for an affordable price.
There is a national shortage of the Robert Simmons brushes, if you can’t get them, please buy any brand of soft imitation sable brushes - not bristle.
Filberts, 2 each of sizes #10, #4, and #1
Rounds, 2 each of size #1"

 ***note: I bought several in each size. I've found while painting later layers it is useful to have several brushes.

******************************************************************
 Painting:
IMG_2573

The idea of the open grisaille is to simply paint only shadow areas and also to have some paint on the panel so that subsequent layers of paint can adhere. Another advantage of creating the open grisaille layer is that you begin to clearly observe the light and shadow areas on the set up.

The first step is to put a small amount of raw umber or burnt umber on the palette. I chose raw umber as my under painting color because it is slightly cooler than burnt umber. My still life set up has a lot of cool earth tones, so I felt this color was a good theme to start with.

Technique: Rather than applying the paint like watercolor, it needs to be somewhat dry. In order to do this, Sadie instructed me to dip just the tip of my brush into the under painting medium and then on to a paper towel to dry out the brush. It is one of those things that sounds easy when put into words, but when practiced is a bit tricky. Sadie corrected my tendency to over-wet the brush many times while I worked on this stage.

IMG_2572

Sadie also recommends using blue shop cloths from a hardware supply store instead of cotton cloths, which I am using here. Cotton or paper towels (even Viva brand) have too much lint, which will build up in the painting. The idea is to have as little lint and dust as possible in each layer of paint.

IMG_2546

I started with the main pine cone working up from the shadows into the dark background. Do not be tempted to over render and get everything looking nicely modeled. Instead, work on painting the shadows and small amounts of transition areas into the light, leaving the light areas open completely.

IMG_2575

The light passages are *not* a thinned down wash of paint, rather are dry brushed paint scumbled lightly on the panel.

IMG_2576


IMG_2574

My completed open grisaille.

IMG_2579

It took me about a day's worth of work to finish this, approximately six hours. At first glance, it might seem like you could blow through the under painting really quickly. However, it is worth slowing down and taking the time to carefully work through each area.

Take a look in the photo below how finely Sadie paints her open grisaille. No wonder her paintings, especially seen in person, are supreme!

*selected from an online article,
"Precise Line, Value and Color, by Sadie J. Valeri", artistsnetwork.com

******************************************************************

***note: As an aside, it is worth mentioning that the Flemish method on wood gessoed panel is excellent for small to medium works, however it becomes impractical the larger the painting is. The wood gesso panel reaches a tipping point in terms of weight the larger it becomes and the technique itself is time consuming; very large works can take several months or more to complete. Also, when working large, the painter can get away with a certain amount of looseness because the viewer tends to stand farther away to view the painting. It was because of these impracticalities that another variation of this technique developed in Venice, called the Venetian Technique, which uses canvas instead of heavy wood. You can read more about it's development by Titian and Giorgione HERE.

Please stay tuned for the next installment, the CLOSED GRISAILLE.